
Kubernetes is a tremendously powerful cluster management system. There are many pluggable technologies to choose from that exhibit the features you desire, which is great because you have options--but also comes with the down-side that the likelihood someone else has done exactly what you are trying to do is slim. Eventually, there will be some consolidation as developers gather around the best solutions, but for the moment, there are lots of interesting projects to choose from (and not a ton of great examples for certain configs). Today, I'm sharing a slightly challenging setup and hoping it helps the community.
I am using Istio as my L7 ingress and routing controller, which is based on Envoy. It is a highly scalable L7 proxy with excellent performance characteristics and relatively mature feature set. When it came time to implement a basic /admin route on a project, I came up with the list of features that I wanted to achieve. My desired config:
- Applications should not have access to user passwords or necessarily email
- Applications should not re-implement role-based access control (RBAC) security, as every application will need it
- Users should be able to login without creating yet another username/password to remember, but support it if they prefer
- Users should be able to self-register, password reset if necessary, and manage what remote authentications are associated with their account without needing support (Google keyword CIAM)
- Application Admins should be able to edit the role of users, either explicitly or by group permissions, with a visual interface for non-technical people to control access
- K8s Ops should be able to change what RBAC rules protect individual routes to applications without a redeploy
- Fully self-hosted, to limit external dependencies and have auditable security around user data
The simplest way to get started is to follow the excellent walkthrough on Jetstack.io that explains in reasonably good detail how to cover your whole ingress with JWT handling. I won't go over all that detail here. Instead, I will present the exact YAML manifests necessary to directly deploy a working config, as well as show screenshots of relevant bits in FusionAuth of exactly how to configure the application so it communicates properly with these manifests.
Why FusionAuth?
I usually try out two or three alternative technologies before settling into one I like. Although I did start with KeyCloak, it felt a little unpolished and left a lot to be desired when it came to explaining how to configure it if the terminology wasn't familiar (eg. people who aren't security professionals). I studied several other options and it came down to Gluu or FusionAuth. The main deciding factor for me in favor of FusionAuth was the amount of documentation and tutorials (with much appreciated touches of humor). There is also a clear effort made by the developers to provide official docker images and Kubernetes examples that show real world use. I have been remarkably satisfied with this decision.
Quick Architecture Overview
Ok, so let's talk about the architecture of how this works together. Like any other traffic using Istio, a request will come into an application by following the routing rules of a VirtualService to a Service, then to a Deployment's Pod. To use the Istio security features, this pod needs to have the Sidecar Proxy running, otherwise the rules don't do anything. (This is unfortunate, as it has been my experience that the sidecar can cause connectivity issues with certain workloads, so just be aware it can cause side effects and you may need to explicitly create and configure the Sidecar for this namespace). The easiest way to get this working is to enable automatic sidecar proxy injection on a new Namespace and deploy the application there. By declaring a RequestAuthentication rule, we configure Istio to refuse any traffic that doesn't have a validly signed Json Web Token (JWT). And by declaring an AuthorizationPolicy rule, we configure Istio to accept or deny traffic by matching specific HTTP paths or user roles, etc. That's great! Right?
Well, Istio isn't quite mature enough to speak Open ID Connect. It's only smart enough to expect a validly decoded JWT and do some simple pattern matching against its contents. When those rules fail, you just get RBAC: access denied as a response to your request. There's no redirection logic to send the browser to the auth server login page. So, let's teach it to do that with a simple EnvoyFilter rule that is injected on SIDECAR_INBOUND. This lets us target specific applications to protect only the routes we care about without impacting anything else.
A few critical details: RequestAuthentication only accepts a JWT that is signed with an RSA key, because HMAC is a symmetrical key and anyone who can decode it can also sign it. This means it needs to know where to get the public RSA key, which is supplied in the issuer field. Assuming this checks out, Istio then looks at any AuthorizationPolicy rules and either ALLOW or DENY traffic based on matching or non-matching details. In this case, I have provided a basic rule that allows anyone who has been verified to have an account with this application, and further restrict the /admin/ path to accounts that have the admin role. Should anything go wrong, Istio just says RBAC: access denied . To diagnose, just delete these rules and try hitting the endpoint to see what errors pop up. If these rules are removed and you are still getting Unauthorized messages, it's oauth2-proxy refusing the user--check the config and logging to see why.
Here's the YAML we've all been waiting for. This fully describes a working config where the VirtualService is in the default namespace but everything else is in auth just to keep it away from everything else. The application is hosted at https://auth-example.reachablegames.com. Certain difficult and undocumented details that cause problems if not configured properly have been commented below--please pay attention before changing or simplifying things.
# create namespace where applications can have sidecar injection
apiVersion: v1
kind: Namespace
metadata:
  labels:
    app: auth
    istio-injection: enabled
  name: auth
---
# This rule makes sure the JWT is decoded and passed through to the web server as HTTP_PAYLOAD base64 encoded.
apiVersion: security.istio.io/v1beta1
kind: RequestAuthentication
metadata:
  name: auth-example
  namespace: auth
spec:
  selector:
    matchLabels:
      app: auth-example
  jwtRules:
  - issuer: "https://fusionauth.reachablegames.com"
    # this passes the full bearer token as the "authorization" header
    forwardOriginalToken: true
    # this passes just the decoded JWT as "payload" header
    outputPayloadToHeader: "payload"
---
# This rule verifies the user is an authenticated user (requestPrincipals) and also authorized (request.auth.claims)
apiVersion: security.istio.io/v1beta1
kind: AuthorizationPolicy
metadata:
  name: auth-example
  namespace: auth
spec:
  selector:
    matchLabels:
      app: auth-example
  action: ALLOW
  rules:
  - from:  # limit admin path to users with admin role
    - source:
        requestPrincipals: ["*"]
    to:
    - operation:
        paths: ["/admin/*"]
    when:
    - key: request.auth.claims[roles]
      values: ["admin"]
  - from:  # allow anyone who is authorized to access the site to access anything other than /admin
    - source:
        requestPrincipals: ["*"]
    to:
    - operation:
        notPaths: ["/admin/*"]
---
# This intercepts and sends the traffic directly to the oauth2-proxy if there isn't a JWT cookie in the header.
apiVersion: networking.istio.io/v1alpha3
kind: EnvoyFilter
metadata:
  name: auth-example
  namespace: auth
spec:
  workloadSelector:
    labels:
      app: auth-example
  configPatches:
  - applyTo: HTTP_FILTER
    match:
      context: SIDECAR_INBOUND
      listener:
        portNumber: 80
        filterChain:
          filter:
            name: envoy.http_connection_manager
            subFilter:
              name: envoy.filters.http.jwt_authn
    patch:
      operation: INSERT_BEFORE
      value:
        name: envoy.filters.http.ext_authz
        typed_config:
          "@type": type.googleapis.com/envoy.config.filter.http.ext_authz.v2.ExtAuthz
          http_service:
            server_uri: # Note, this absolutely must be the FQDN for the service.  Does not work as a shortname.
              uri: http://auth-example-oauthproxy.auth.svc.cluster.local:8081
              cluster: outbound|8081||auth-example-oauthproxy.auth.svc.cluster.local
              timeout: 10s
            authorizationRequest:
              allowedHeaders:
                patterns:
                - exact: cookie
            authorizationResponse:
              allowedUpstreamHeaders:
                patterns:
                - exact: authorization
---
# Critical: spell out the FQDN because this VirtualService is in "default" but the Service is in "auth"
apiVersion: networking.istio.io/v1alpha3
kind: VirtualService
metadata:
  name: auth-example
  namespace: default
  labels:
    app: auth-example
spec:
  hosts:
  - "auth-example.reachablegames.com"
  gateways:
  - istio-gw
  http:
  - route:
    - destination:
        host: auth-example.auth.svc.cluster.local  # this refers to a Service with name="auth-example"
        port:
          number: 80
---
# Sends traffic to the auth-example deployment pods, which is our application we are trying to secure
apiVersion: v1
kind: Service
metadata:
  name: auth-example
  namespace: auth
  labels:
    app: auth-example
spec:
  ports:
  - port: 80
    name: http-web
    targetPort: http-web
    protocol: TCP
  selector:
    app: auth-example  # send traffic to the auth-example pods
  sessionAffinity: None
  type: ClusterIP
---
# Sends traffic to the oauth2-proxy deployment pods, which is only called if a JWT is missing.
apiVersion: v1
kind: Service
metadata:
  name: auth-example-oauthproxy
  namespace: auth
  labels:
    app: auth-example-oauthproxy
spec:
  ports:
  - port: 8081
    name: http-oauthproxy
    targetPort: http-oauthproxy
    protocol: TCP
  selector:
    app: auth-example-oauthproxy  # send traffic to the auth-example-oauthproxy pods
  sessionAffinity: None
  type: ClusterIP
---
# This is the deployment for your application workload you want to secure.
# Configured so the index page shows PHP info, so you can check out the cookies easily.
apiVersion: apps/v1
kind: Deployment
metadata:
  name: auth-example
  namespace: auth
  labels:
    app: auth-example
spec:
  selector:
    matchLabels:
      app: auth-example
  strategy:
    type: Recreate
  template:
    metadata:
      annotations:  # The namespace must be annotated to allow sidecar injection for this to work.
        sidecar.istio.io/inject: "true"
      labels:
        app: auth-example
        version: 1.0.0
    spec:
      containers:
      - image: php:7-apache
        name: www
        ports:
        - containerPort: 80
          name: http-web
        volumeMounts:
        - name: www-configmap
          mountPath: /var/www/html/index.php
          subPath: index.php
        - name: www-configmap
          mountPath: /var/www/html/admin/index.html
          subPath: admin.html
        resources:
          limits:
            cpu: "1.0"
            memory: "1Gi"
          requests:
            cpu: "0.25"
            memory: "250Mi"
      volumes:
      - name: www-configmap
        configMap:
          name: www-configmap
          items:
          - key: index.php
            path: index.php
          - key: admin.html
            path: admin.html
---
# This handles the OIDC redirects when the ExtAuthz filter sends them.
apiVersion: apps/v1
kind: Deployment
metadata:
  name: auth-example-oauthproxy
  namespace: auth
  labels:
    app: auth-example-oauthproxy
spec:
  selector:
    matchLabels:
      app: auth-example-oauthproxy
  strategy:
    type: Recreate
  template:
    metadata:
      annotations:
        sidecar.istio.io/inject: "false"
      labels:
        app: auth-example-oauthproxy
        version: 1.0.0
    spec:
      containers:
      - image: quay.io/oauth2-proxy/oauth2-proxy:v6.1.1-amd64
        name: oauth2-proxy
        args: ["--config=/etc/oauth2-config.conf"]
        ports:
        - containerPort: 8081
          name: http-oauthproxy
        volumeMounts:
        - name: www-configmap
          mountPath: /etc/oauth2-config.conf
          subPath: oauth2-config.conf
        livenessProbe:
          initialDelaySeconds: 10
          timeoutSeconds: 10
          periodSeconds: 30
          failureThreshold: 5
          httpGet:
            path: /ping
            port: http-oauthproxy
        readinessProbe:
          initialDelaySeconds: 20
          timeoutSeconds: 10
          periodSeconds: 30
          failureThreshold: 5
          httpGet:
            path: /ping
            port: http-oauthproxy
        resources:
          limits:
            cpu: "0.300"
            memory: "200Mi"
          requests:
            cpu: "0.100"
            memory: "100Mi"
      volumes:
      - name: www-configmap
        configMap:
          name: www-configmap
          items:
          - key: oauth2-config.conf
            path: oauth2-config.conf
---
# random config files
---
apiVersion: v1
kind: ConfigMap
metadata:
  name: www-configmap
  namespace: auth
  labels:
    app: auth-example
data:
  index.php: |
    <?php
    phpinfo();
  admin.html: |
    <html><body>This is the admin page.</body></html>
  oauth2-config.conf: |
    provider = "oidc"
    cookie_secure = true
    cookie_samesite = "lax"
    cookie_refresh = "1h"
    cookie_expire = "4h"
    cookie_name = "_auth_example_reachablegames_com"
    set_authorization_header = true
    email_domains = [ "*" ]
    http_address = "0.0.0.0:8081"
    upstreams = [ "static://200" ]
    skip_provider_button = true
    oidc_issuer_url = "https://fusionauth.reachablegames.com"
    insecure_oidc_allow_unverified_email = true
    client_id = "3404cf81-1797-49d8-af75-dad5ad7455b9"
    client_secret = "pmwlc2vTt60vZiq4w0dKAO363nIqIuYdpsN6Ms-5NU4"
    cookie_secret = "*ThisCanBeAny32LettersYouChoose*"
---
The above has some critical details, each of which has been called out in the YAML as comments. It is important to also mention that the very bottom shows a client_id and client_secret that matches details that are generated by FusionAuth. Your ids will be different. Obviously, you'll want to change the cookie_secret as well, but note it must be exactly 32 characters long or the oauth2-proxy pod will fail to start. Finally, if you configure the Application in FusionAuth to send emails to validate users before letting them in, you can remove the insecure_oidc_allow_unverified_email = true line. I've included it here just to make testing easier, because setting up email config is just another step or two and this blog is long enough!
FusionAuth Configuration
Great, now there's a YAML on the page, everyone stopped reading! Not so fast. You need FusionAuth to actually handle the OIDC redirects and serve login pages, as well as generate the JWT that Istio will use to validate your users. Here's the YAML for it, too:
apiVersion: networking.istio.io/v1alpha3
kind: VirtualService
metadata:
  name: fusionauth
  labels:
    app: fusionauth
spec:
  hosts:
  - "fusionauth.reachablegames.com"
  gateways:
  - istio-gw
  http:
  - match:
    - uri:
        prefix: /
    route:
    - destination:
        host: fusionauth
        port:
          number: 80
---
apiVersion: v1
kind: Service
metadata:
  name: fusionauth
  labels:
    app: fusionauth
spec:
  ports:
  - port: 80
    name: http-web
    protocol: TCP
    targetPort: http-web
  selector:
    app: fusionauth
  sessionAffinity: None
  type: ClusterIP
---
apiVersion: v1
kind: Service
metadata:
  name: fusionauth-db
  labels:
    app: fusionauth-db
spec:
  ports:
    - port: 5432
      targetPort: postgres
  selector:
    app: fusionauth-db
  clusterIP: None
---
# user database for fusionauth
apiVersion: apps/v1
kind: StatefulSet
metadata:
  name: fusionauth-db
  labels:
    app: fusionauth-db
spec:
  serviceName: fusionauth-db
  replicas: 1
  selector:
    matchLabels:
      app: fusionauth-db
  updateStrategy:
    type: RollingUpdate
  template:
    metadata:
      annotations:
        sidecar.istio.io/inject: "false"
      labels:
        app: fusionauth-db
        version: 1.0.0
    spec:
      containers:
      - image: postgres:11.9-alpine
        name: postgres
        env:
        - name: PGDATA
          value: /var/lib/postgresql/data/pgdata
        - name: POSTGRES_USER
          value: pguser
        - name: POSTGRES_PASSWORD
          value: pgpass
        - name: POSTGRES_DB
          value: fusionauth
        ports:
        - containerPort: 5432
          name: postgres
        resources:
          limits:
            cpu: "3.0"
            memory: "3Gi"
          requests:
            cpu: "0.25"
            memory: "250Mi"
        volumeMounts:
        - name: fusionauth-storage
          mountPath: /var/lib/postgresql/data
      volumes:
      - name: fusionauth-storage
        persistentVolumeClaim:
          claimName: fusionauth-storage
  volumeClaimTemplates:
  - metadata:
      name: fusionauth-storage
    spec:
      accessModes: [ "ReadWriteOnce" ]
      storageClassName: "freenas-keep" ### Change to match your storage system
      resources:
        requests:
          storage: 10Gi
---
apiVersion: apps/v1
kind: Deployment
metadata:
  name: fusionauth
  labels:
    app: fusionauth
spec:
  replicas: 1
  strategy:
    type: Recreate
  selector:
    matchLabels:
      app: fusionauth
  template:
    metadata:
      annotations:
        sidecar.istio.io/inject: "false"
      labels:
        app: fusionauth
        version: 1.0.0
    spec:
      securityContext:
        runAsUser: 1000
        runAsGroup: 1000
        fsGroup: 1000
        fsGroupChangePolicy: "Always"
      containers:
      - name: fusionauth
        image: fusionauth/fusionauth-app:latest
        imagePullPolicy: Always
        env:
        - name: DATABASE_URL
          value: jdbc:postgresql://fusionauth-db:5432/fusionauth
        - name: DATABASE_ROOT_USERNAME
          value: pguser
        - name: DATABASE_ROOT_PASSWORD
          value: pgpass
        - name: DATABASE_USERNAME
          value: pguser
        - name: DATABASE_PASSWORD
          value: pgpass
        - name: FUSIONAUTH_APP_MEMORY
          value: 512M
        - name: FUSIONAUTH_APP_RUNTIME_MODE
          value: development
        - name: FUSIONAUTH_APP_URL
          value: https://fusionauth.reachablegames.com/
        - name: SEARCH_TYPE
          value: database
        - name: ES_JAVA_OPTS
          value: "-Xms256m -Xmx512m"
        ports:
        - containerPort: 9011
          name: http-web
        livenessProbe:
          initialDelaySeconds: 10
          timeoutSeconds: 10
          periodSeconds: 30
          failureThreshold: 5
          httpGet:
            path: /
            port: http-web
        readinessProbe:
          initialDelaySeconds: 10
          timeoutSeconds: 10
          periodSeconds: 30
          failureThreshold: 5
          httpGet:
            path: /
            port: http-web
        resources:
          limits:
            cpu: "1.0"
            memory: "1G"
          requests:
            cpu: "0.25"
            memory: "250M"
        volumeMounts:
        - name: fusionauth-pvc
          mountPath: /usr/local/fusionauth/config
          subPath: config
      volumes:
      - name: fusionauth-pvc
        persistentVolumeClaim:
          claimName: fusionauth-pvc  ### Change this to match a PVC in your environment
The above YAML deploys both a Postgres DB and a FusionAuth deployment that can be scaled independently of each other. Obviously, my storage system will be different from yours, so change the two places where the PersistentVolumeClaim and storageClassName match your storage environment. Once you launch, go to the hosted walkthrough to configure FusionAuth. It doesn't take long, and as a consequence creates your first superadmin user. The rest of this post is a visual walkthrough of how to configure FusionAuth correctly to:
- Provide unattended user account sign-up
- Create the application authentication context
- Create two roles with different levels of permissions on the application
Steps not shown here: Creating a subdomain, configuing your ingressgateway to use https certs, etc. Ok, DEPLOY FUSIONAUTH NOW. kubectl apply -f fusionauth.yaml
Configure the Tenant
FusionAuth is a multi-tenant system, where a single tenant may have multiple applications. FusionAuth considers itself an application, and uses the same authentication and authorization system for managing itself as it does for external applications. So don't delete your permissions, or you get locked out!
The very first thing we want to do is create two RSA keys that will be used to asymmetrically sign the JWTs, so Istio will accept them. The default is HMAC, so let's change that.
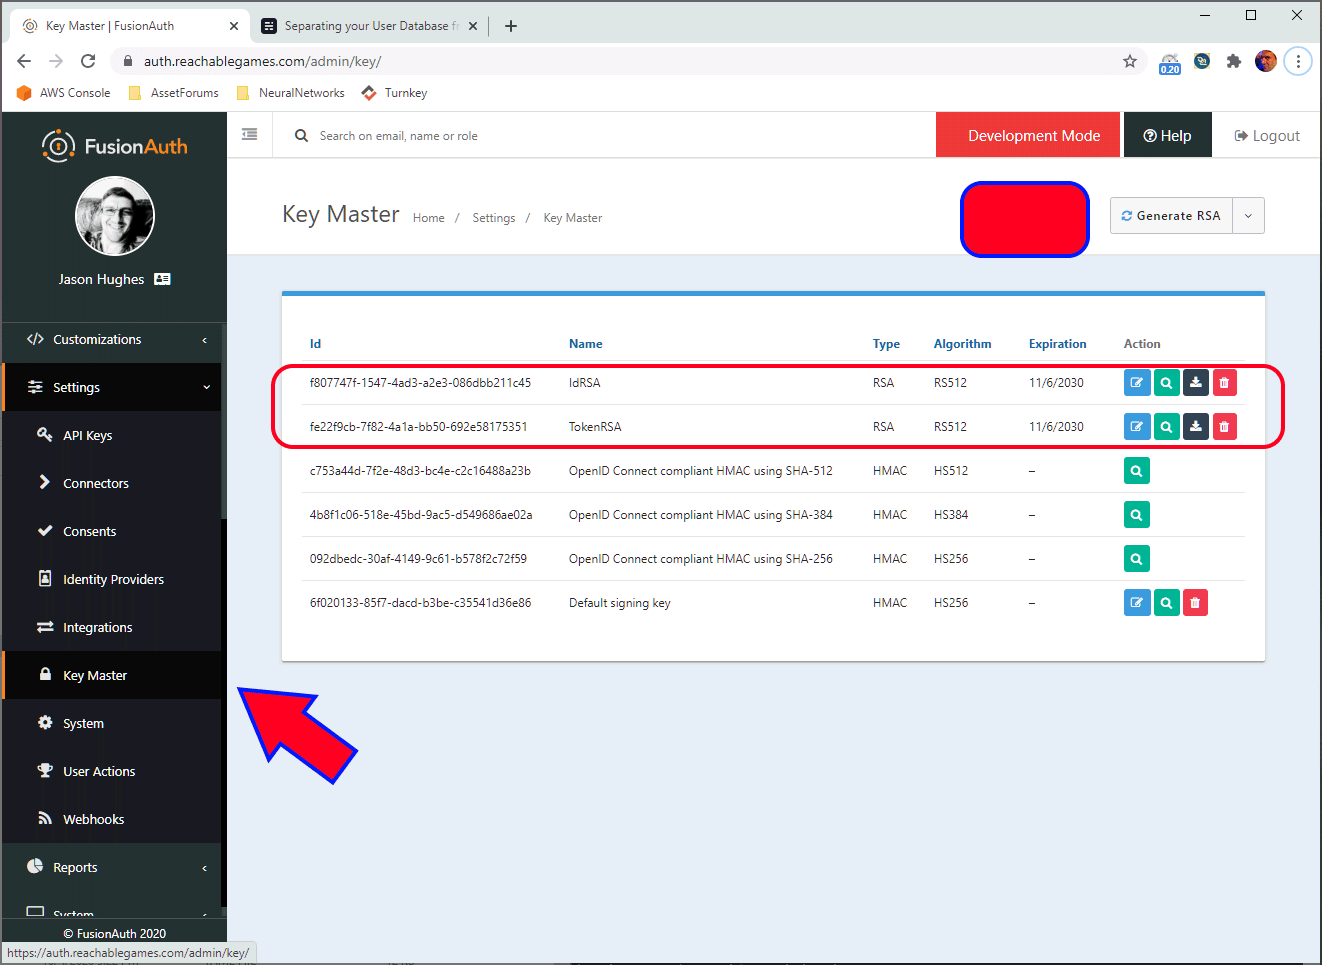
Next, let's configure the Tenant to use these keys. That makes all applications use them by default, which is one less step to remember when you add new applications in the future. (Yes, you can use FusionAuth for many different domains, apps, routes, etc, and keep them logically separate at the user DB if you like. Don't try to reuse the oauth2-proxy, just deploy another, since the client_secret will be different per application.)
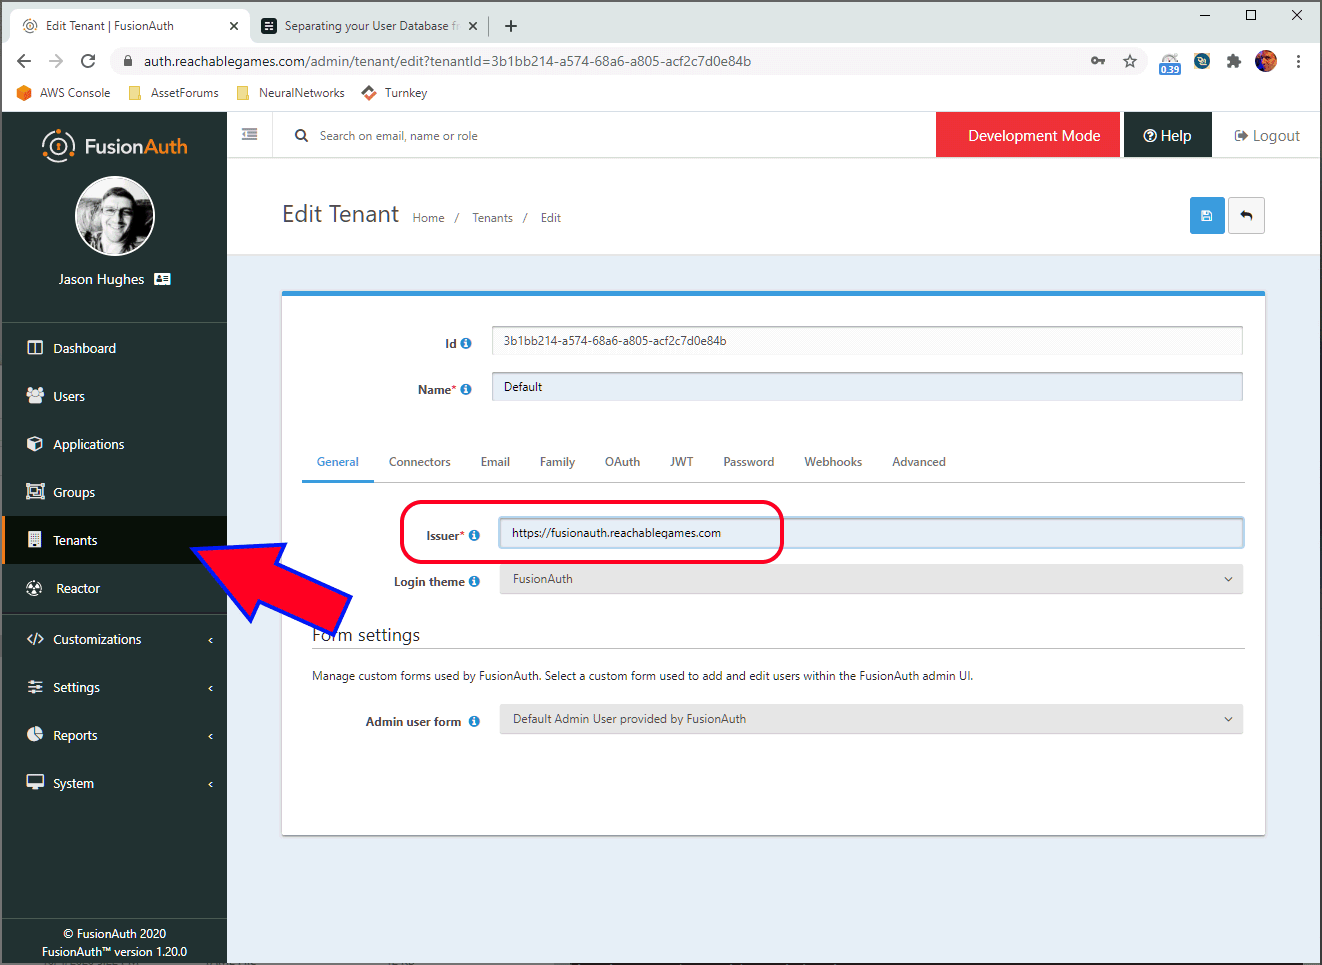
The Issuer field must exactly match the RequestAuthentication issuer field and the oidc_issuer_url field in the oauth2-proxy config.

Select the default Token and Id signing keys and select the RSA keys you generated above. Make sure you click the blue SAVE button or it won't take. That's common throughout their UI, and I point it out on most of the images.
Create an Application
Okay, the Tenant is setup properly. Let's make our Application now.
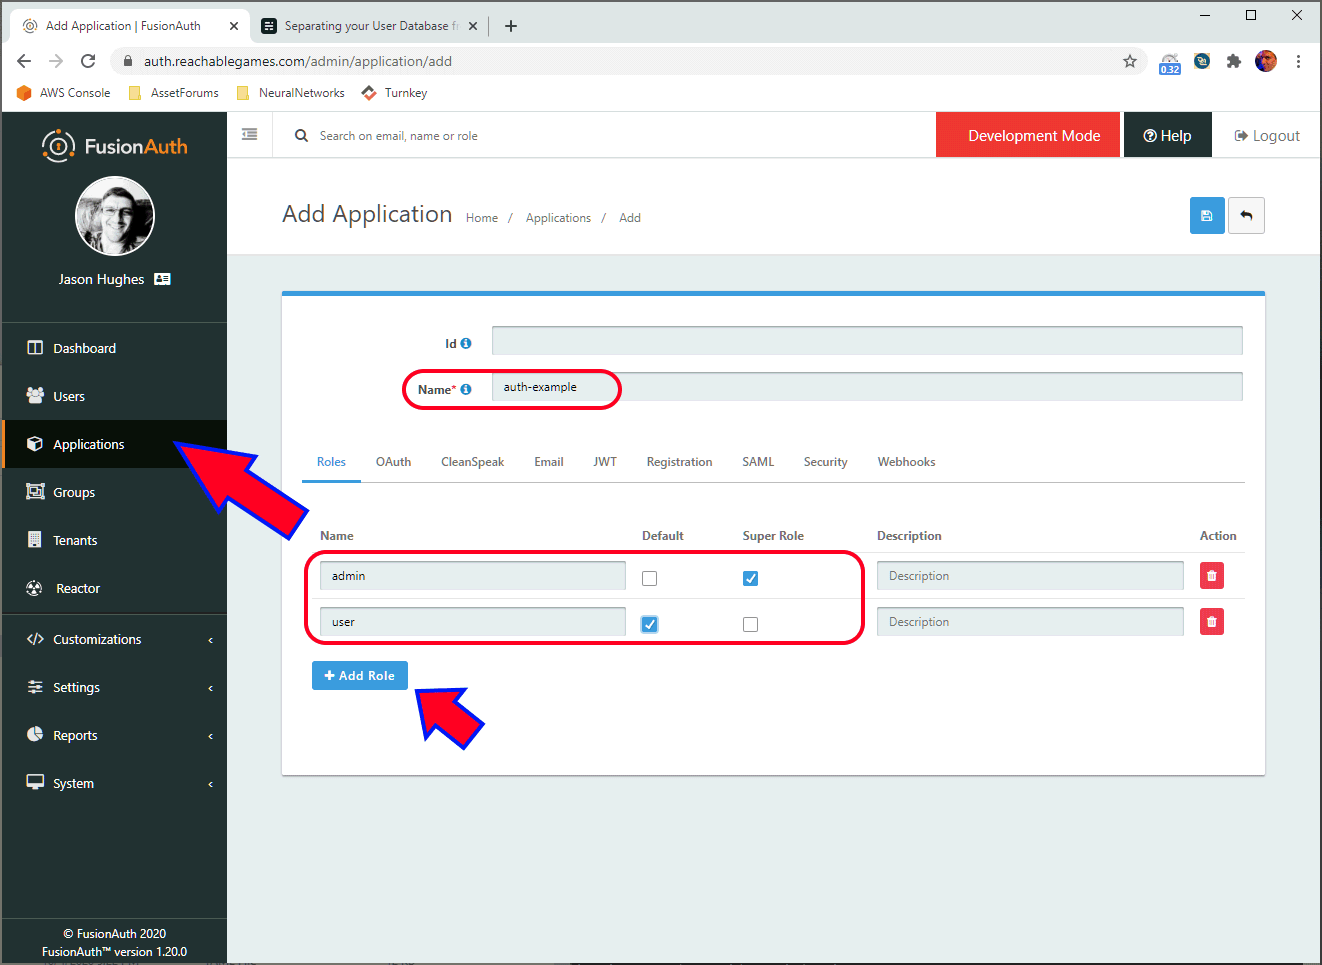
The name of the application is purely for display purposes. Add two roles here, carefully naming them user and admin. Make sure the checkboxes are configured as shown, so everyone gets the user role upon registration (first login), and admins have full permissions.
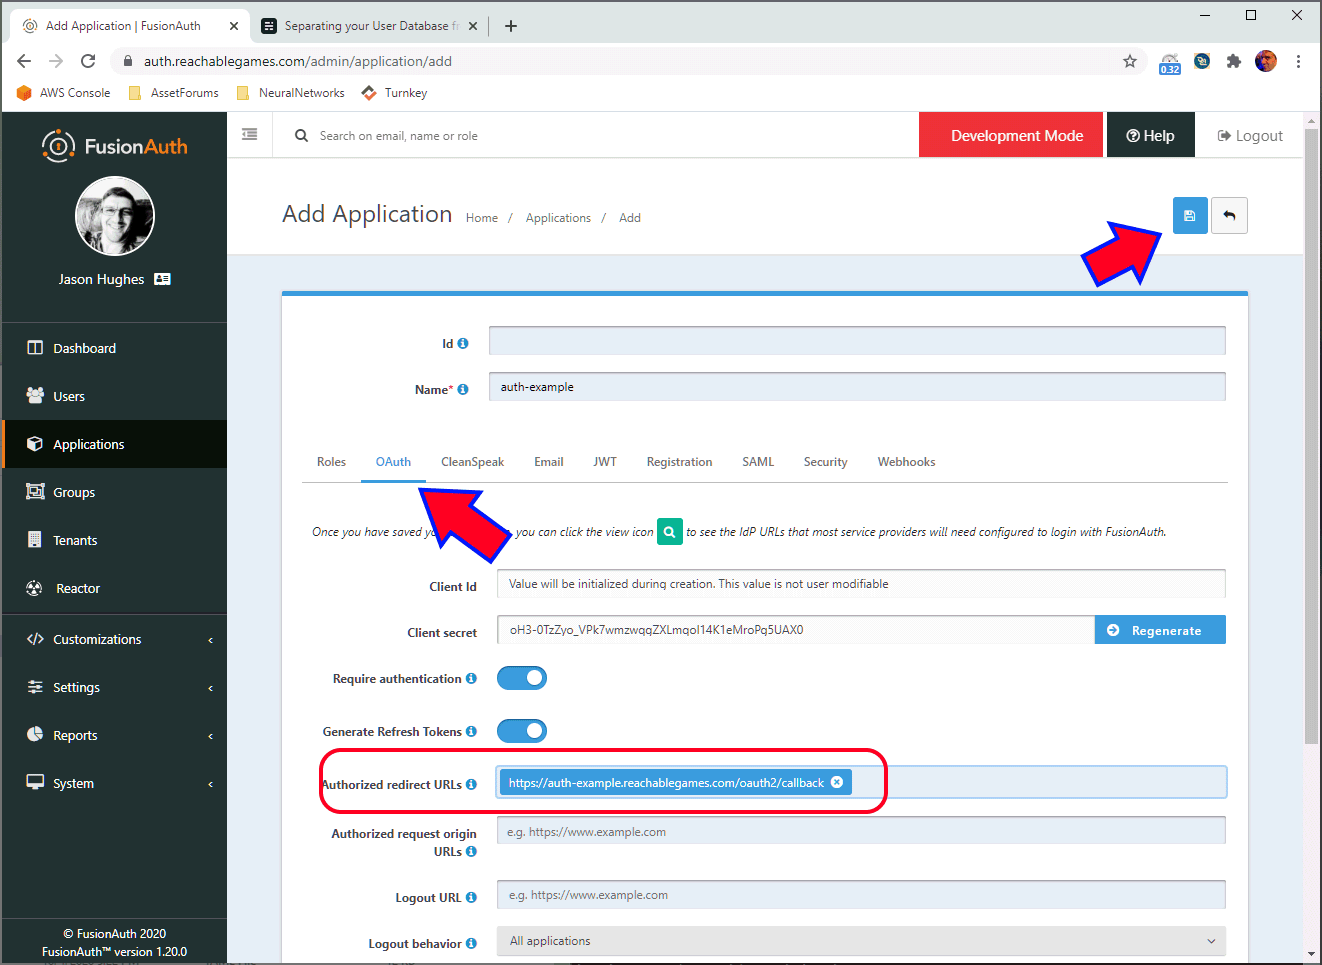
On the OAuth tab, the ClientId will be empty until you hit Save, so we swing back and get it in a minute. Make sure you have a domain configured that points to your app... I have no idea what other places you might need to configure the URL to be different (send me a note if you manage to figure it out). FusionAuth will absolutely refuse to attempt to redirect a user anywhere that is not listed in the field above, for security reasons. Click Save.
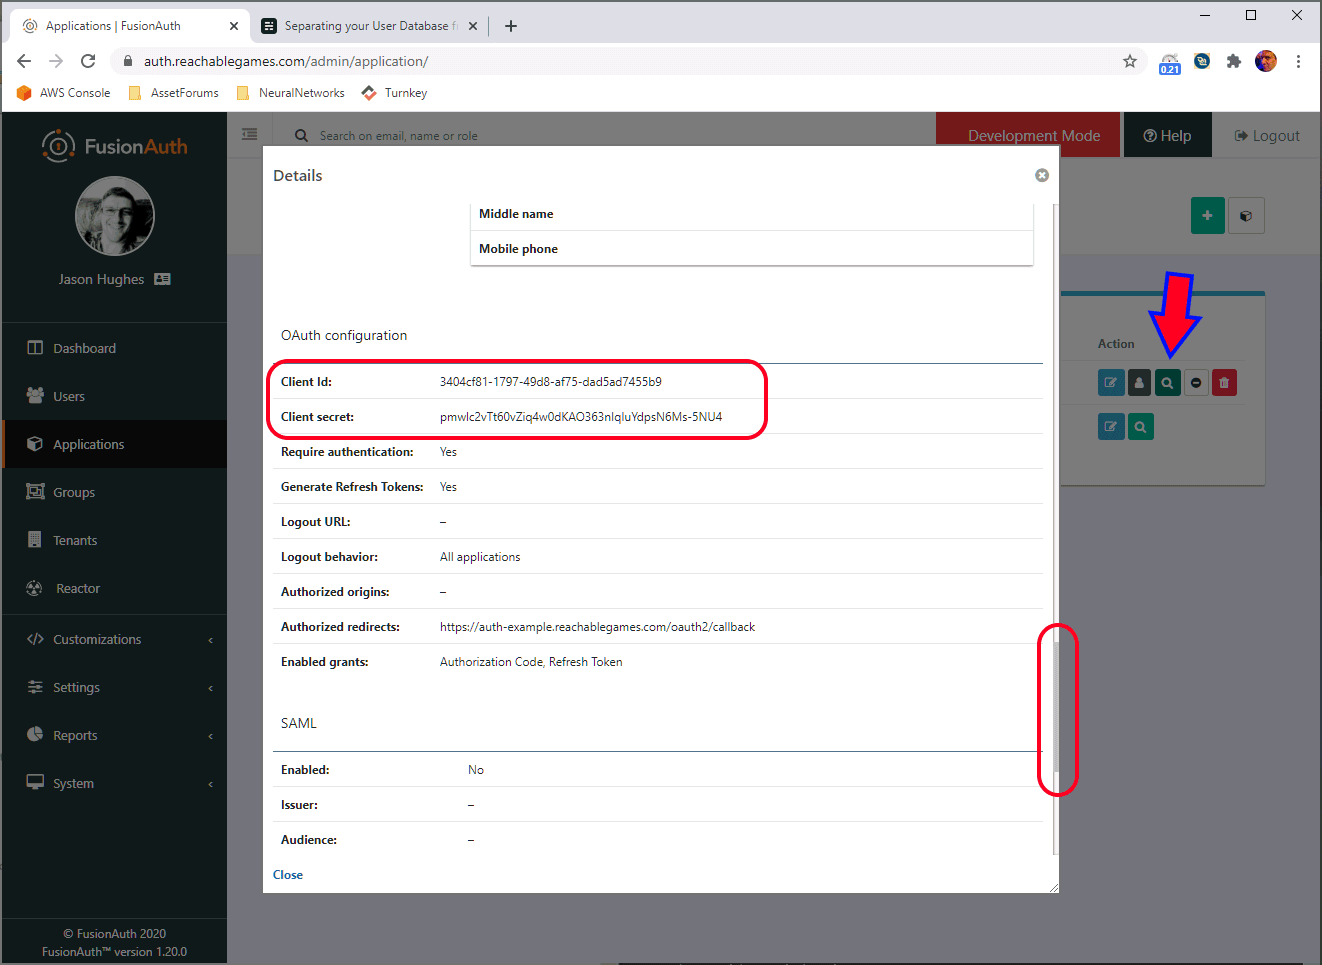
Ok, now that we saved the application, you can click the little magnifier and scroll down a bit to get the ClientId and ClientSecret. These need to be pasted into the YAML into the oauth2 configmap, so it trusts the JWT signature.
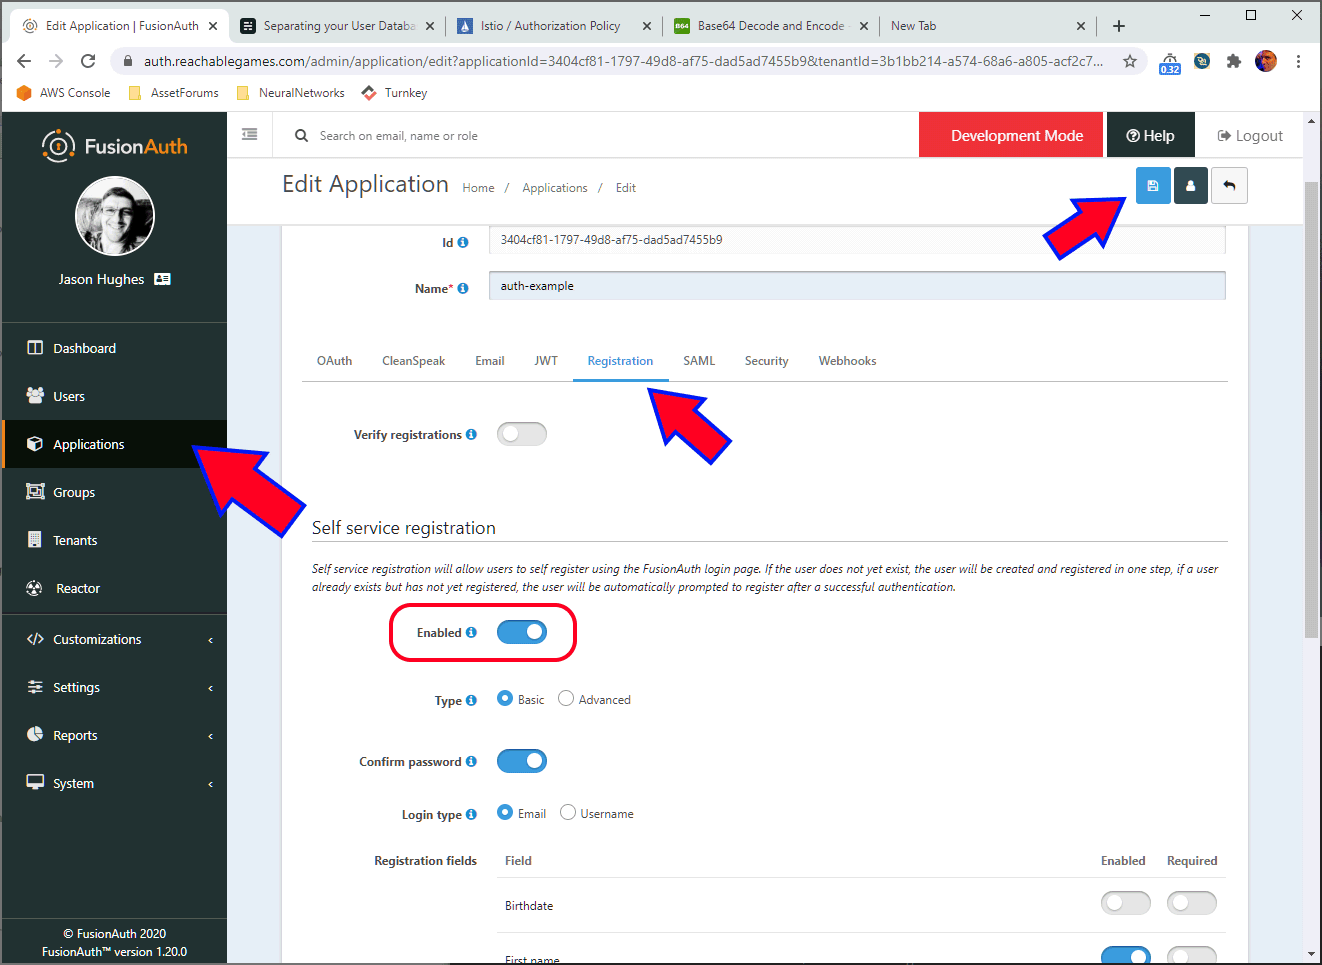
If you want to create users manually, you can skip this step, I guess. Of course, there are ways to restrict users in the oauth2-proxy config to reject any users who don't have email addresses in your domain, or from a whitelist you control, etc. But I find the FusionAuth UI easier to navigate and create users than having to edit YAML and having to reboot oauth2-proxy to pick up changes.
Configure Roles by Group Membership
I prefer to have groups rather than assign individual roles, so it's easier to manage a number of users at once. FusionAuth does not send the group memberships into the JWT (as far as I can tell) but it does pass the roles that group membership implies. That's fine--Istio does a bad job of checking for group membership anyway, but does really well with roles.
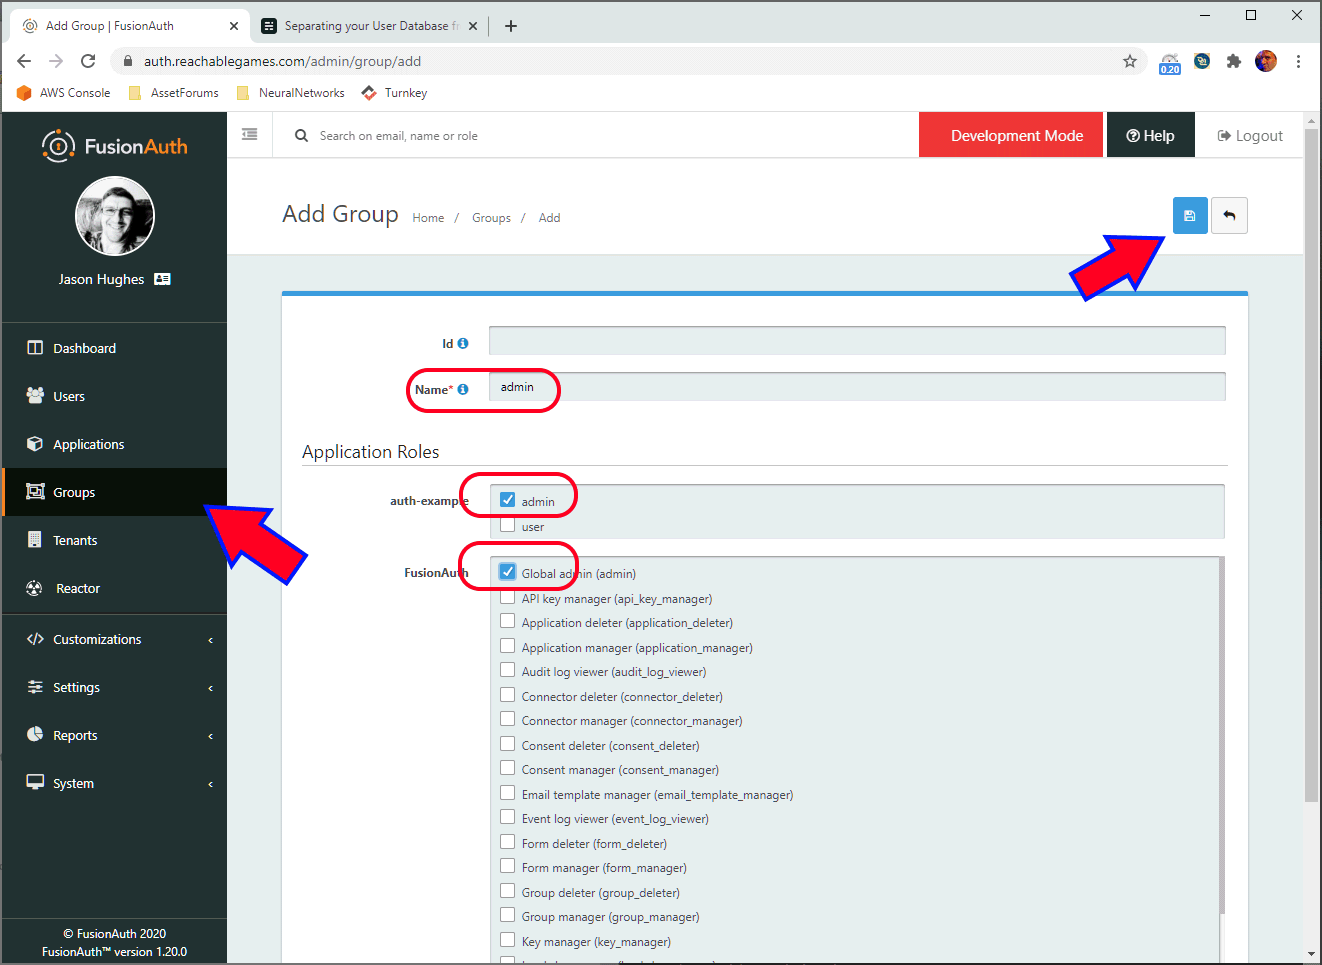
Simply create a new group called admin and give it the roles you want an admin to have in any applications you have configured.
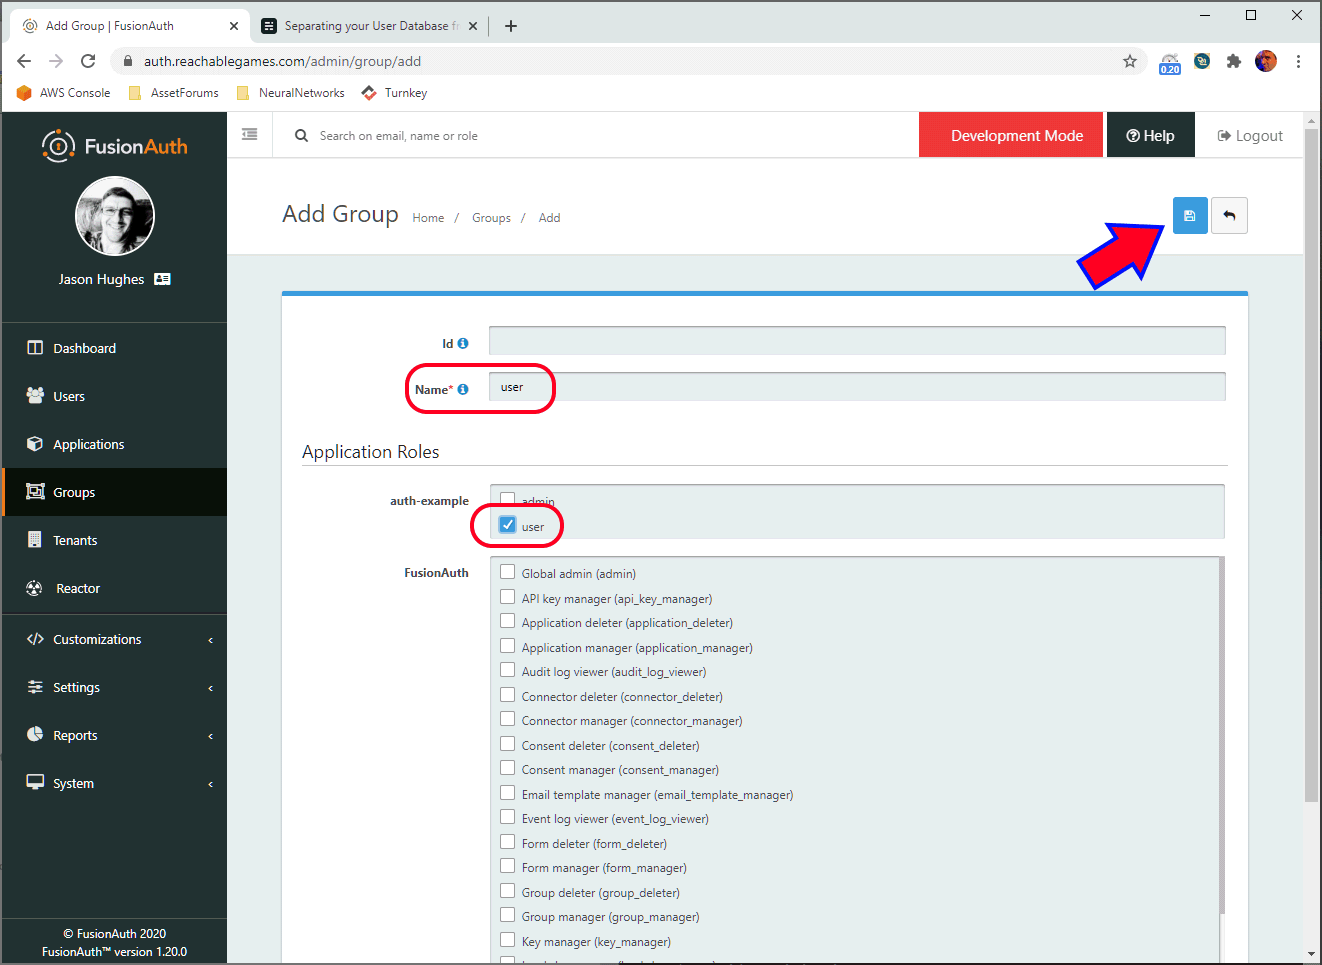
Similarly, create a user group and give it the user role for the application. This group isn't very useful, since everyone gets the user role by default, but it's clear you can make multiple different groups here that have different permissions.
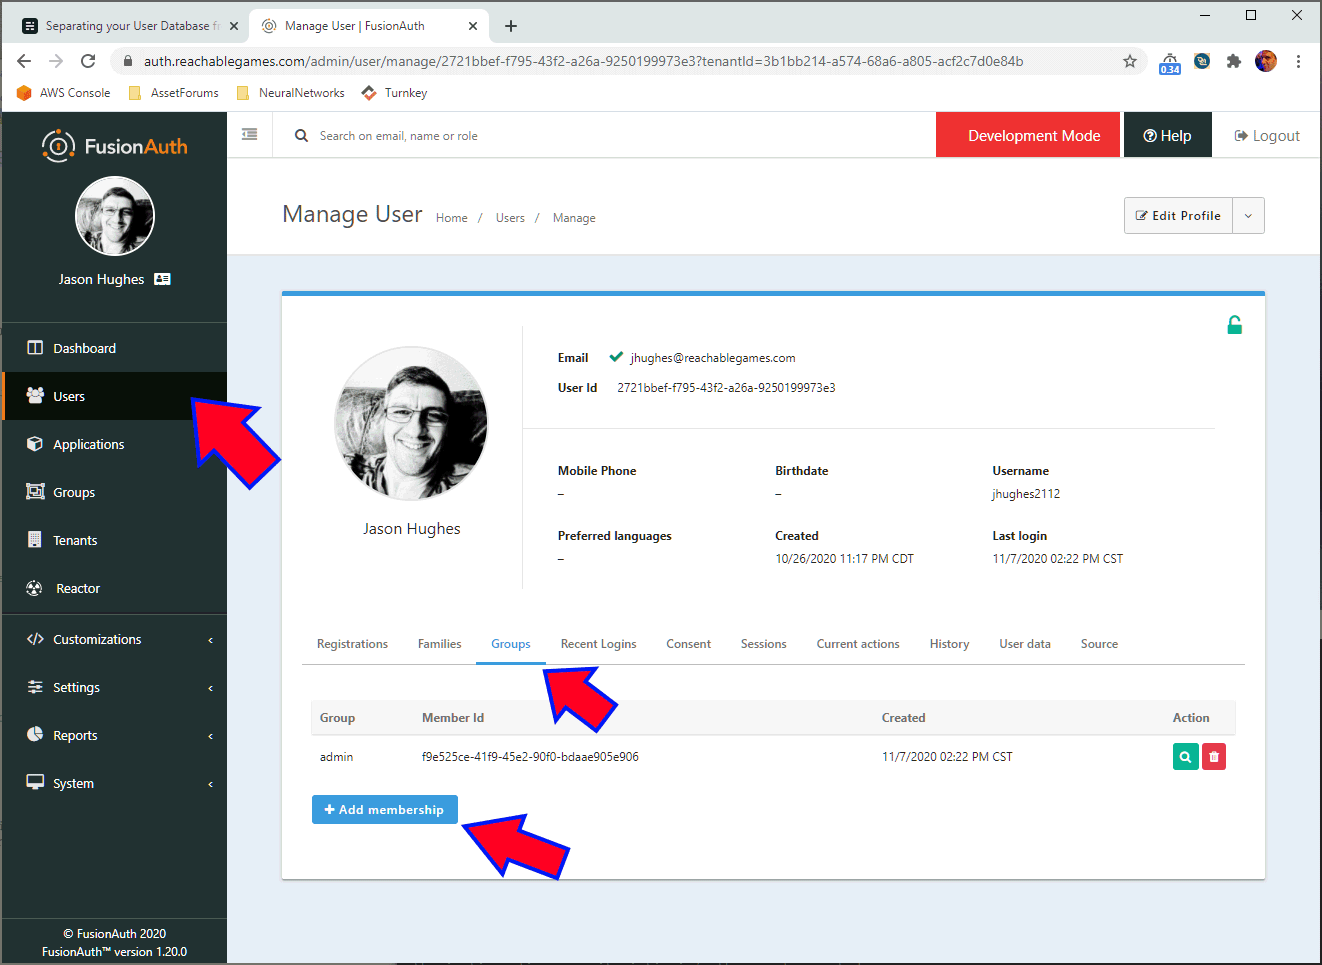
Finally, go the the users tab and add yourself to the admin group. Keep in mind that if you add any new applications, you'll have to update the groups to include roles in those applications, similarly to what is shown above. But all your users will pick up those roles automatically. Slick!
Not shown here: Create subdomain for your application, configuring ingressgateway to have certs for https. Alrighty, DEPLOY THE APPLICATION NOW. kubectl apply -f auth-example.yaml Ok, let's try it out!
Testing
Firstly, know that cookies like to hang around, so always test in an Incognito window, otherwise you'll get tangled up in old cookies. Also know that if you leave Incognito windows open anywhere, they all share cookies, so close them all before opening a new one.
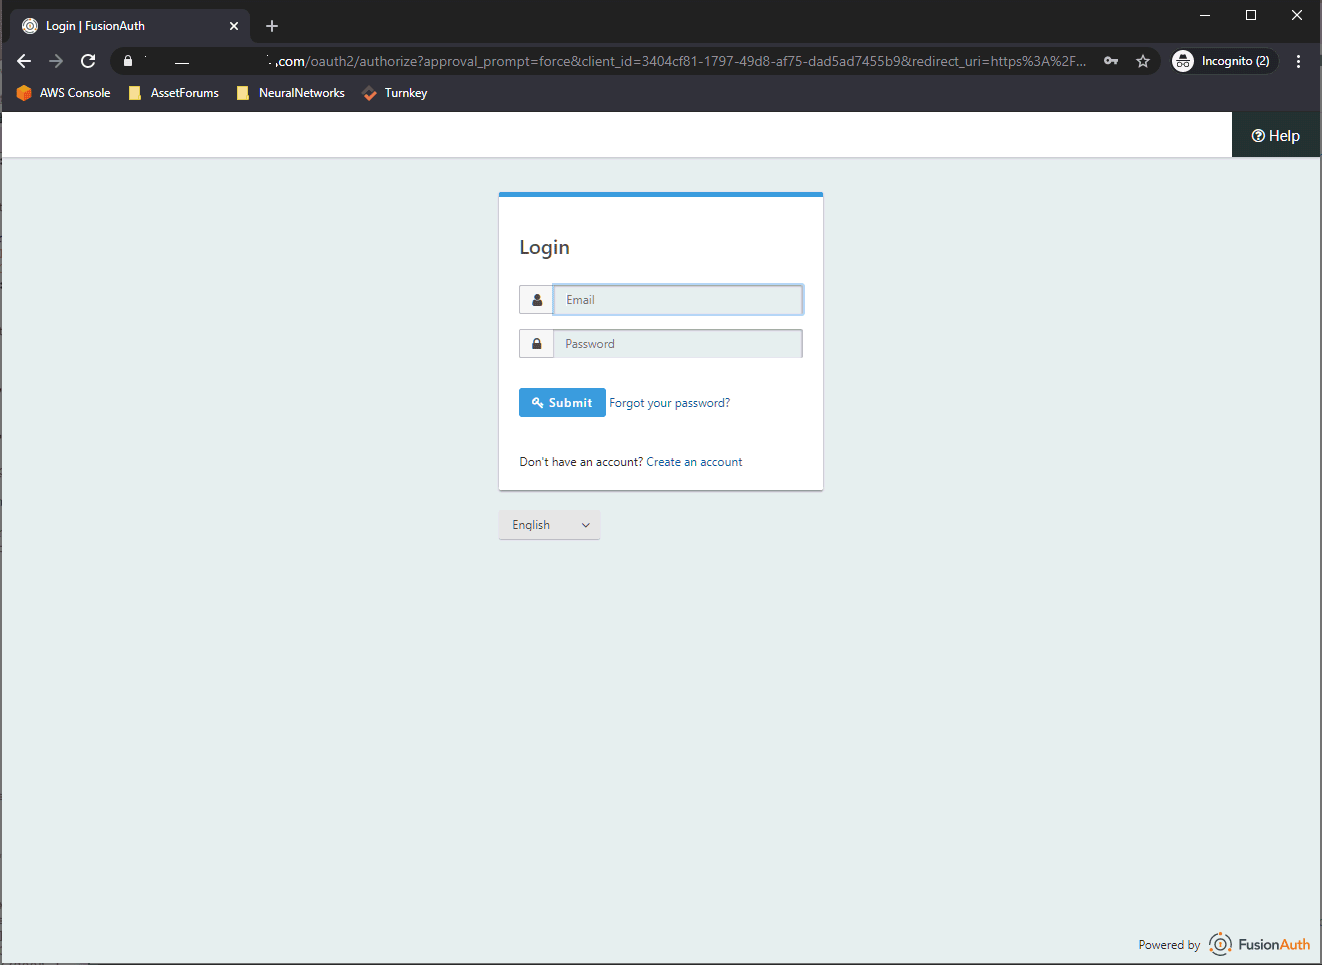
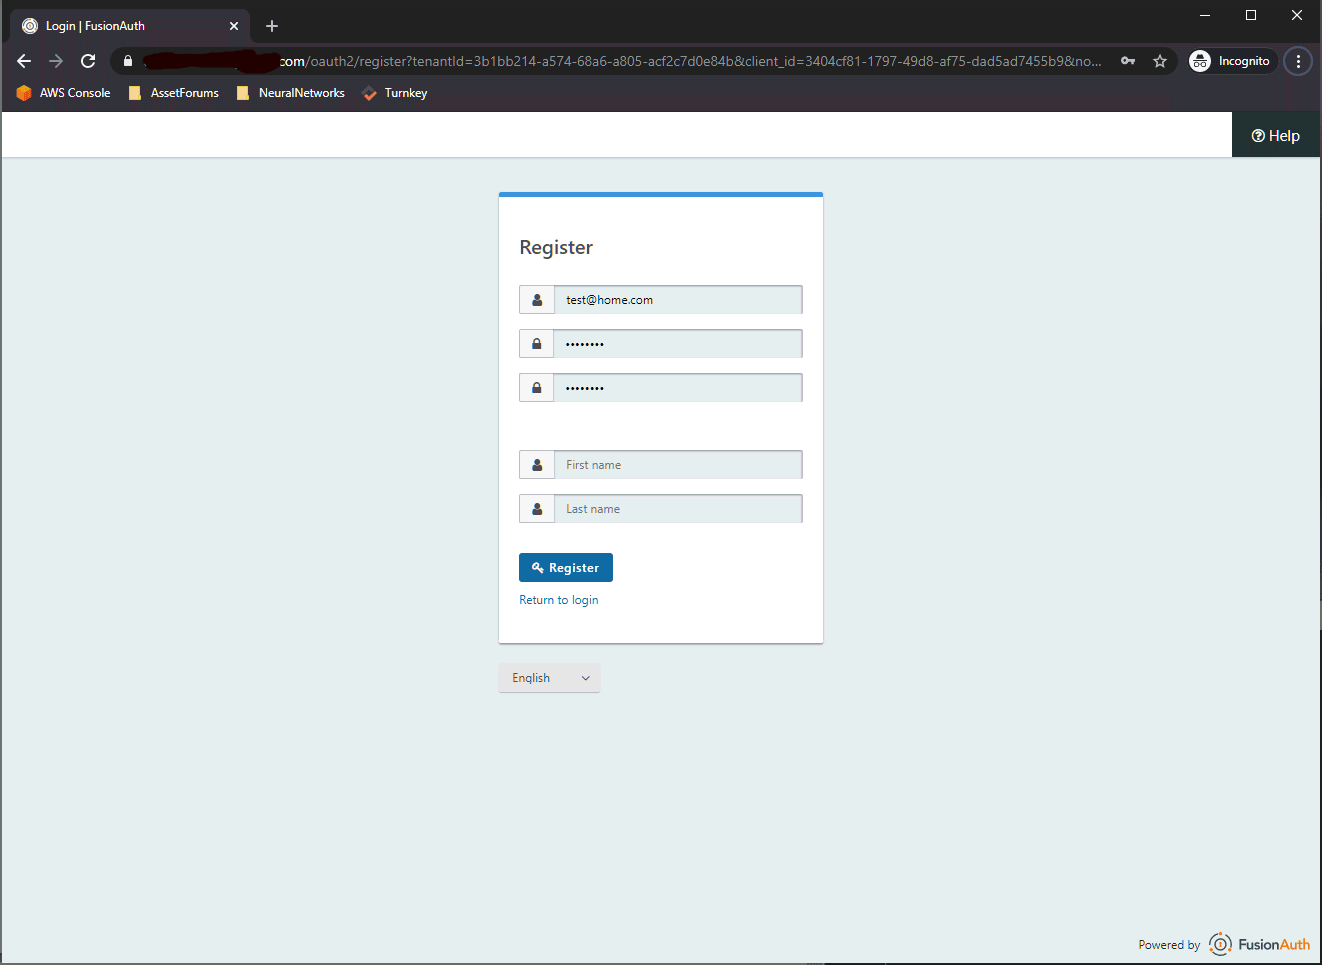
Go to https://auth-example.yourdomain.com/ and it should redirect you to the https://fusionauth.yourdomain.com/ page with a lot of gibberish in the URI. You can login as your admin user here to verify it's all connected properly. Notice it has a Create an Account link? That's not present if you skipped Self Service Registration.
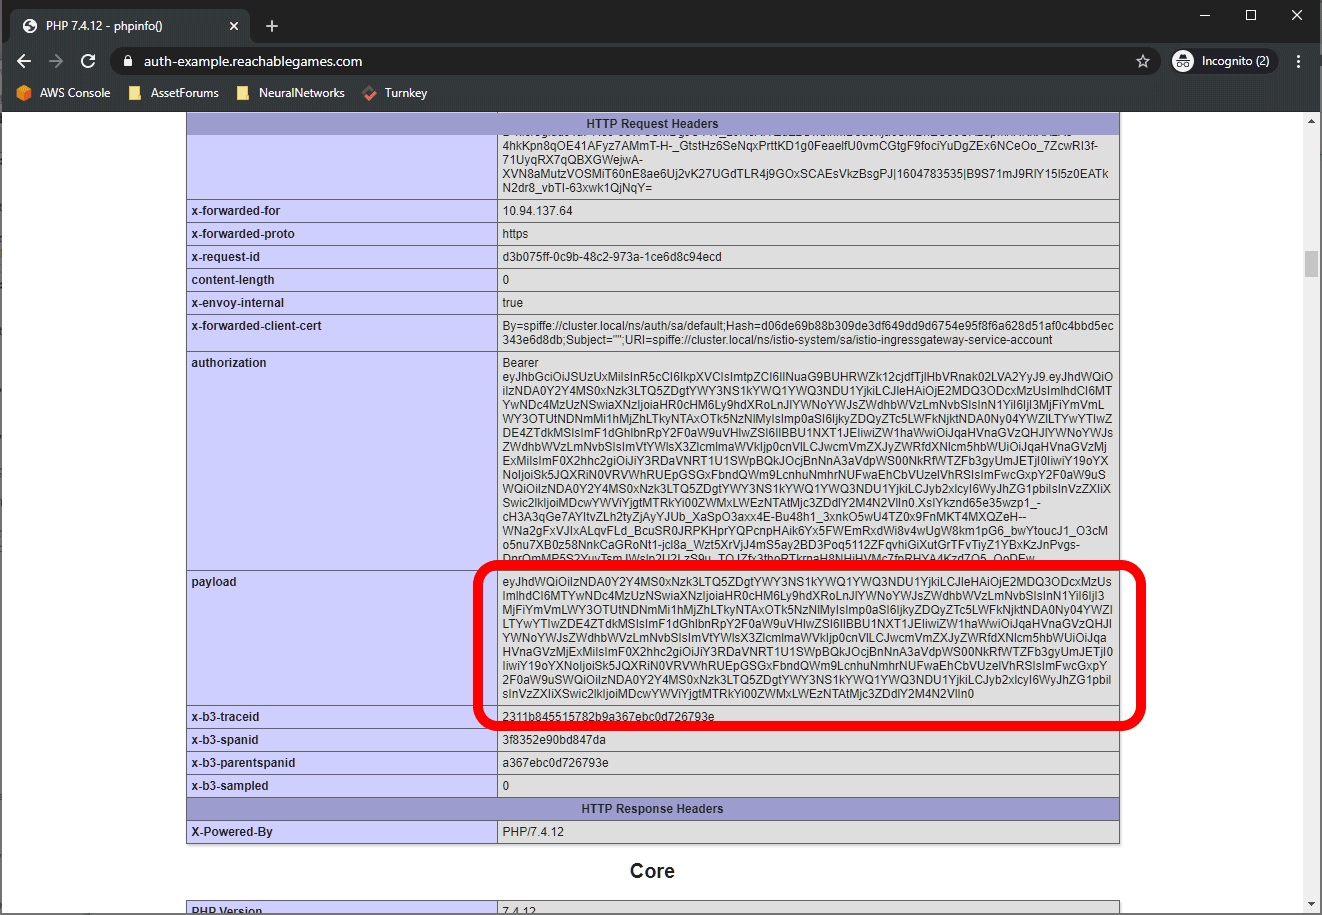
Once you are logged in, you should be redirected to wherever you initially tried to go. The index page of this application is just showing phpinfo(); which is handy for showing all the cookies and headers. You can see the authorization has the full Bearer text, but Istio can also provide just the JWT payload in an easily digestible form, which I have configured to be in the payload header. You can just base64 decode this and get at whatever data you like. Here's an example of the contents:
{
    "aud": "3404cf81-1797-49d8-af75-dad5ad7455b9",
    "exp": 1604776177,
    "iat": 1604772577,
    "iss": "https://fusionauth.reachablegames.com",
    "sub": "3731bbef-f795-43f2-a26a-9250199973e5",
    "jti": "b989699e-51dd-45d1-83a9-6ae43bf2c209",
    "authenticationType": "PASSWORD",
    "email": "jhughes@reachablegames.com",
    "email_verified": true,
    "preferred_username": "jhughes2112",
    "at_hash": "706NDKTSJvypMOTyDOkBB2sGQxDXeDrOW-hed3o1H6c",
    "c_hash": "7pjSV1nOu9uN-gGNHXYlFYqnu5HbgFcsCSY5ktnjCIo",
    "applicationId": "3404cf81-1797-49d8-af75-dad5ad7455b9",
    "roles": ["admin", "user"],
    "sid": "f4109504-3001-45d4-a4a3-7fe638954557"
}
Notice that if email is provided by the authorization scheme, it will arrive in the JWT. However, you probably want to use sub as the user key, because FusionAuth is capable of letting users update their email address, while sub does not change. Similarly, I am pretty sure multiple social login methods can be tied to a single account. Short story is, don't use email as the account key. It isn't stable.
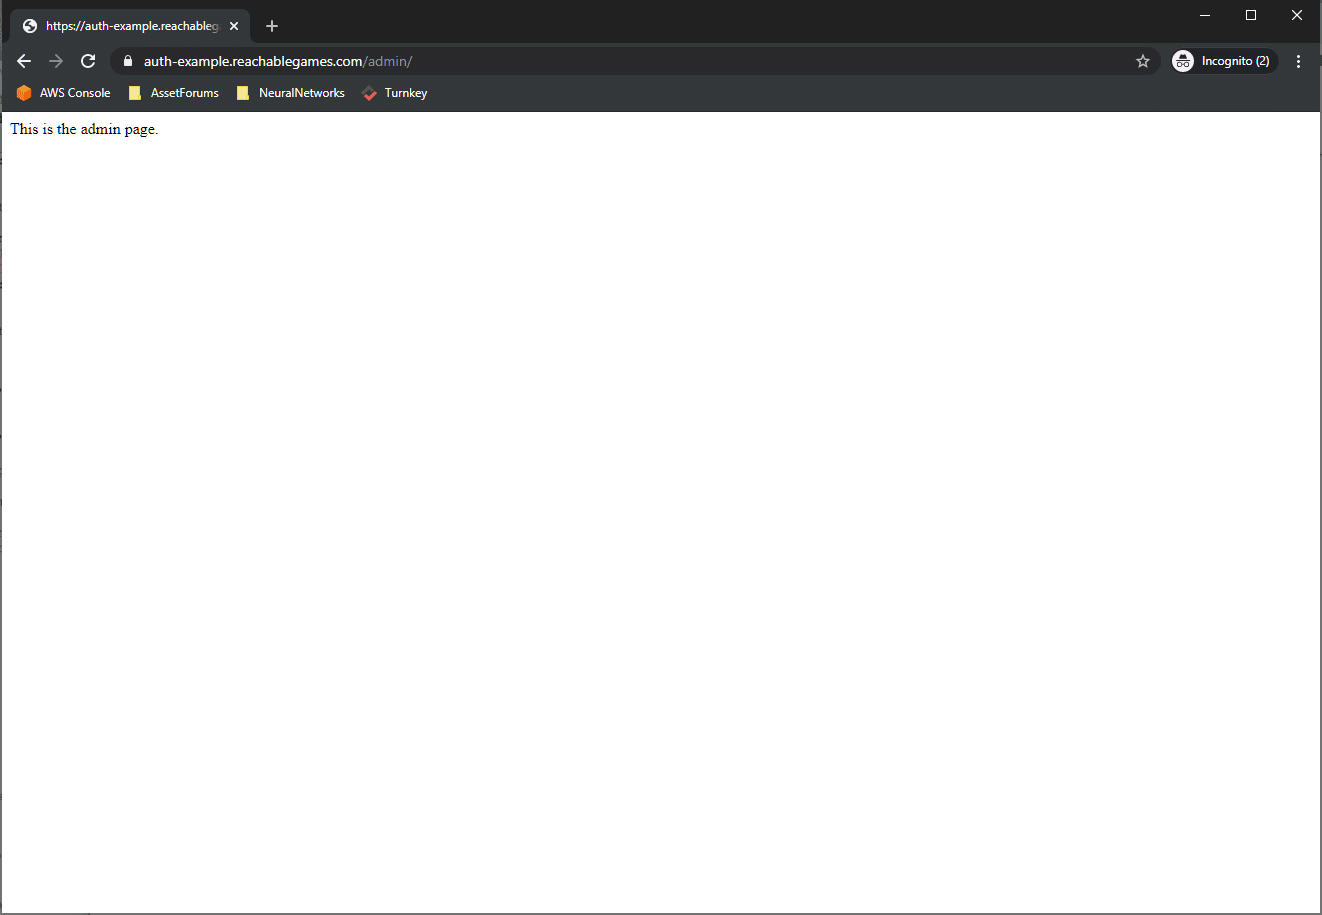
Try out the /admin/ page just to make sure your admin user can get there. Next, create a new user that uses the basic login flow.
Once you get through the create step, you are automatically given access to the application. If you go back and configure the Email tab and enable Account Verification, FusionAuth will send users an email and deny them access until they click the link in the email. I've used it--it does work.
Alrighty. So, you should get to the phpinfo(); display page with this new user. I double-dog dare you to try to get to the /admin/ page, though. Here's what you should see:
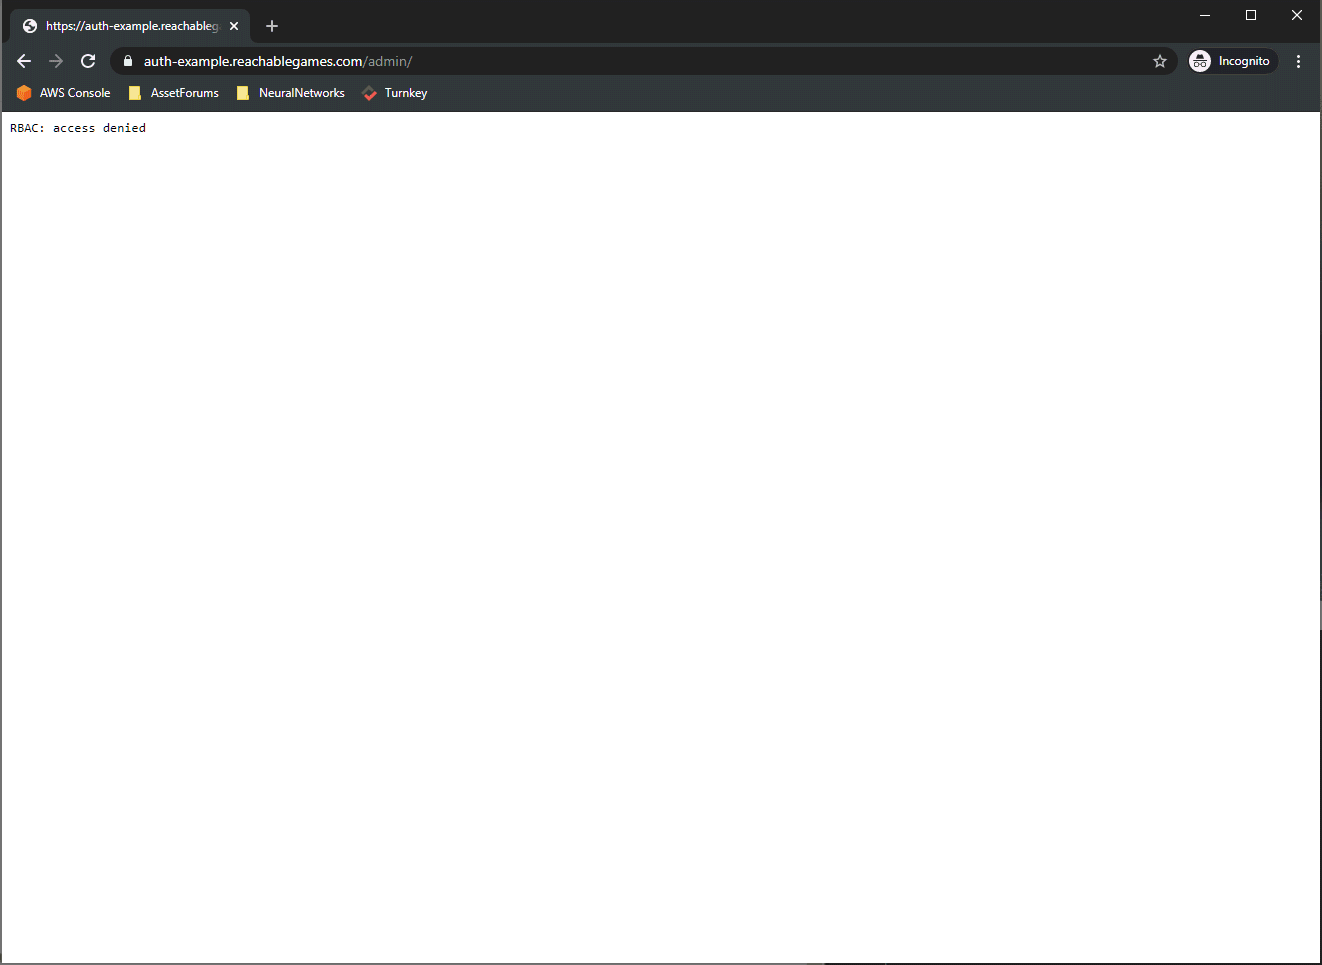
Nope, this is off-limits, because this user only has the user role, not admin. This is perfect! I hope you all get some mileage out of this. I spent about a month trying all the permutations until I figured out all the little details, and had to document it somewhere before it faded away.